
This post will explain how to setup a Nextcloud server on Amazon Web Services with the following features:
- based on a virtual Linux server in the Cloud (AWS Lightsail)
AWS Lightsail is an easy-to-use service from Amazon that let’s you spin up a virtual server in less then a minute; the cheapest one is 5 USD/month - uses AWS S3 as a storage backend
AWS S3 is Amazon’s object storage solution; I use it here due to its low cost (100 GB is just 2.45 USD/month) - is reachable via the internet at a subdomain of your choosing (e.g. mycloud.example.com)
- supports HTTPS with CA-signed certificates from Let’s Encrypt
Let’s encrypt provides free CA-signed certificates for the average person; they are sponsored by Mozilla, Google and others
This post is split into several parts – here is an outline:
- Part 1: create a virtual Linux server on AWS Lightsail
- Part 2: generate credentials for AWS S3
- Part 3: install and configure Nextcloud
- Part 4: point your subdomain to the virtual server
- Part 5: enable HTTPS and create certificates
Part 1: Create the virtual server
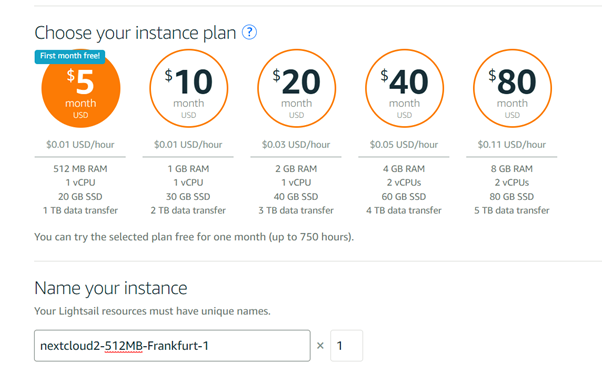
First, we need to create a server. We will be using a small virtual Linux server which runs Ubuntu.
-
- Log in to AWS Lightsail; create an account if you don’t have one.
- Create a new Linux instance running Ubuntu

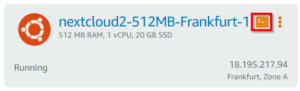
- Your instance should be up and running after a minute or so. To verify this, you can log in to the instance via SSH using the console-button in in Lightsail:

- Before we start playing with the instance though, there are two more things to do: In the web console, go to manage -> networking to see the network settings for your instance:

- Add HTTPS (port 443) to the list of open ports; this will allow incoming connections via HTTPS
- Click the button “Create static IP” to get a public IP address that never changes. If you skip this step, Amazon might change your instance’s public IP address during a restart. This would mess up the DNS settings we will put in place later.
- Note down the static IP address; we will need it later.
Part 2: Create a user for AWS S3
Since we want to use AWS S3 as a storage backend, we need to give your new instance access to the S3 service. We will do this by creating a new user and getting the so-called API-Access Key. This key will then later be used to configure Nextcloud.
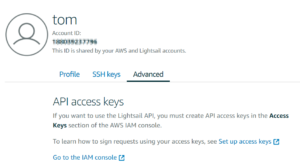
To get your API access key, do the following:- In the Lightsail web page, go to Account -> Advanced; click the link Go to the IAM console
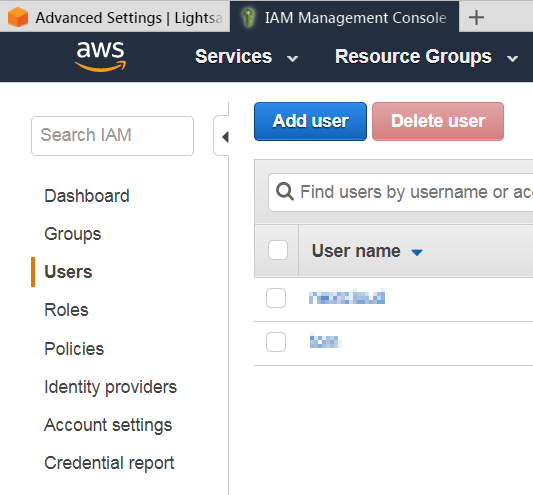
- In the IAM console, go to the Users-section and click Add User

- Create a new user with the following settings:
- Username: nextcloud (you can also pick something else if you like)
- Access type: Programmatic access
- Click “Next: Permissions”

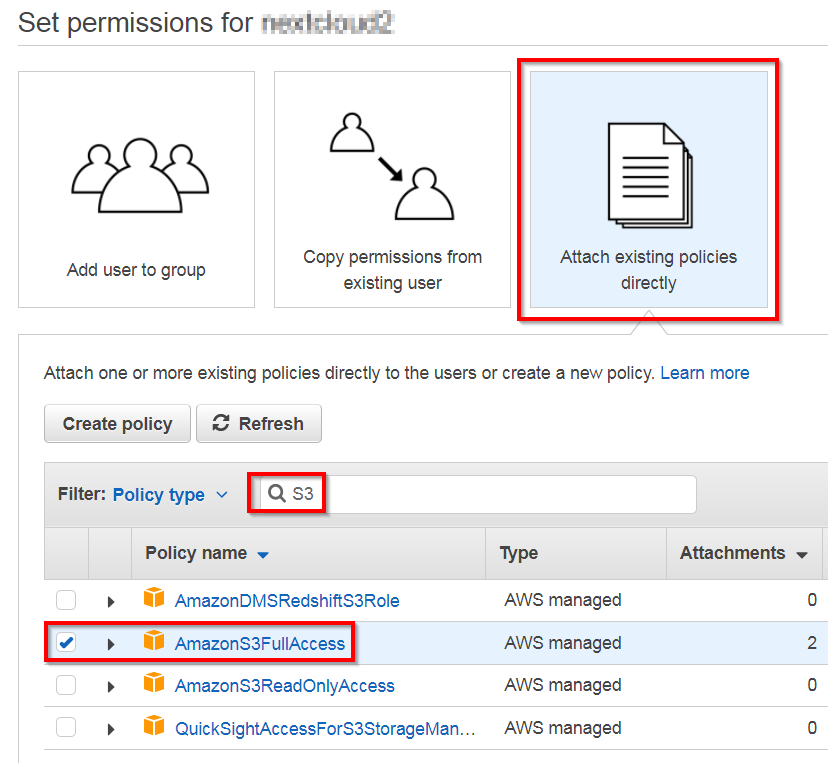
- Select “Attach existing policies directly”
- Filter for “S3” and select AmazonS3FullAccess
- Click “Next: Review” and then “Create user”
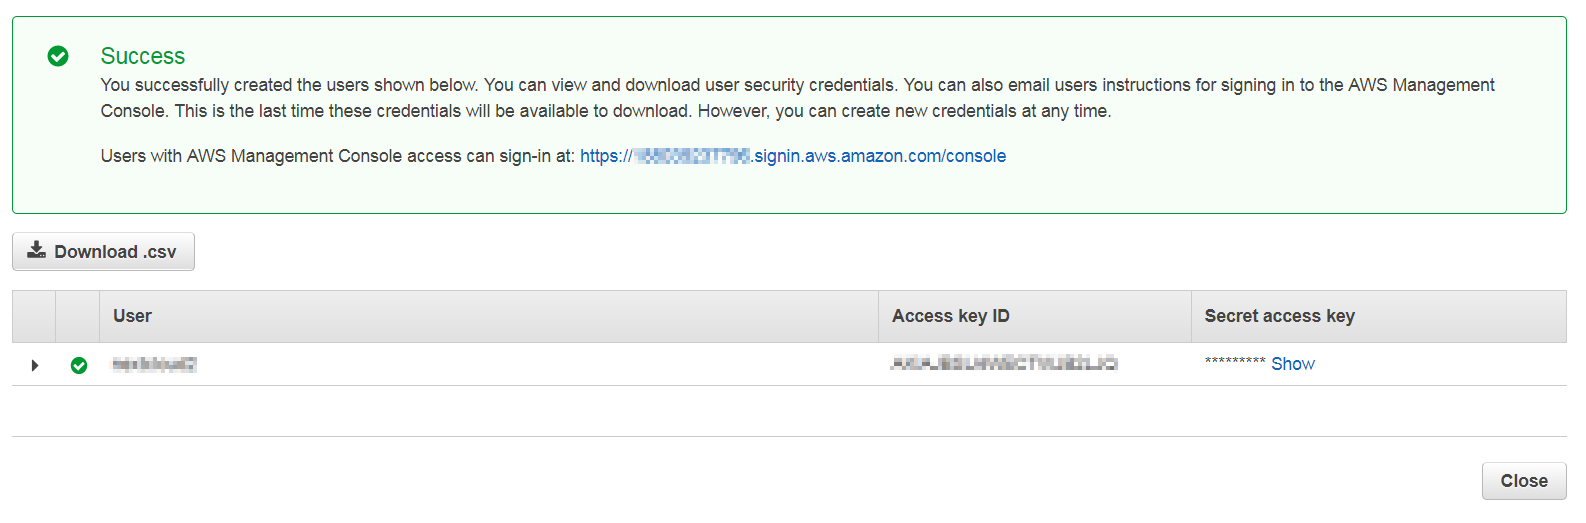
- The new user will be created and Amazon shows you the security credentials. Copy the access key ID and the secret access key – we will need those later.

Make sure to copy those NOW. Amazon will not show you the secret access key again.
Part 3: Install Snap, Nextcloud and configure S3 access
In Part 3, we will install Nextcloud and configure it for access to S3. For installing Nextcloud, we will use the pre-packaged Nextcloud Snap. This already comes pre-configured and brings all its dependencies. Plus, it contains an easy-to-use script to add certificates for HTTPS later.
- In the AWS Lightsail web console, click the console-button to login via SSH.
- First, we need to install Snap; Snap is a kind of container/package manager that runs software bundles including all their dependencies; it also keeps those bundles up-to-date automatically. To install snap, simply type:
sudo apt update
sudo apt install snap
- Once snap is installed, we can install the Nextcloud Snap:
sudo snap install nextcloud
- Before doing anything else, we need to configure Nextcloud to use S3 as primary storage. To do this, add the following section to /var/snap/nextcloud/current/nextcloud/config/config.php:
'objectstore' => array(
  'class' => 'OC\\Files\\ObjectStore\\S3',
  'arguments' => array(
    'bucket' => '<choose a bucket name>',
    'region' => '<region where your instance resides, e.g. eu-central-1 for Frankfurt>',
    'autocreate' => true,
    'key' => '<your API key from part 2>',
    'secret' => '<your API key secret from part 2>',
    'use_ssl' => true
  ),
),
A couple of notes on this:
- Nextcloud will automatically create the S3 bucket you specify in the region that you specify
Make sure that the S3 bucket and the instance are in the same region to avoid paying cross-region data transfer cost - The so-called bucket name is S3-terminology for a folder.
This name needs to be unique (like an e-mail address). So just using “nextcloud” is not going to work.
I recommend something like <mycloud.example.com-currentdate>. - To edit the config file, you need root-permissions
- it is important to make this setting BEFORE setting up the admin account for Nextcloud. The reason is that changing the primary storage breaks all user profiles in Nextcloud – this includes the admin profile (see this Issue in Nextcloud’s github for more details).
- Nextcloud will automatically create the S3 bucket you specify in the region that you specify
- Now we are ready to setup the Nextcloud admin account and make Nextcloud ready-to-run: In the SSH console type:
sudo nextcloud.manual-install admin <admin password of your choosing>
- Finally, let us add the domains from which Nextcloud will be served. Open config.php for editing again (it looks different this time due to the installation in the previous step).
- In config.php, find the section for trusted_domains. Add the IP address of your instance and also the domain:
'trusted_domains' => array (0 => 'localhost', 1 => '111.122.133.144', 2 => 'mycloud.example.com',),
- Restart the Nextcloud snap with
sudo snap restart nextcloud
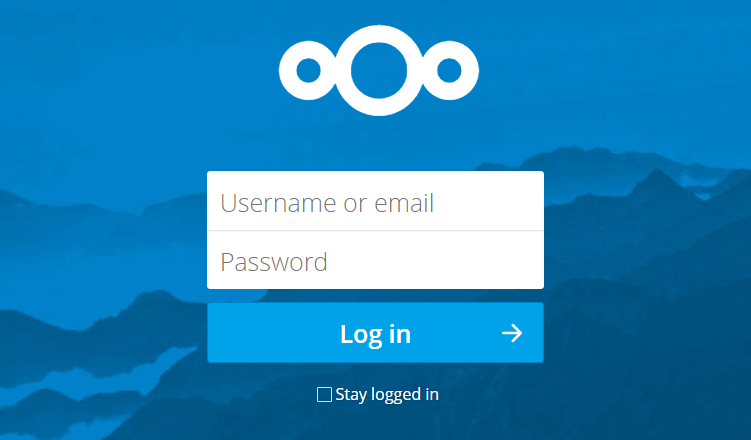
- Open a browser and visit your IP address: http://111.122.133.144. You should see the login page for Nextcloud. You should be able to login with your admin password.

Part 4: Setup Subdomain
In this chapter, we will point your subdomain (e.g. mycloud.example.com) to the virtual instance’s static IP address. I assume here that you already have a domain registered (e.g. example.com). How exactly this works highly depends on the provider you used for registering the domain. Hence I can only provide an abstract description here:
- Go to your domain registrar website (the company where you got the domain) and log in
- Open the DNS settings for your domain (example.com)
- Create a new A-record that points the subdomain (mycloud.example.com) to the static IP address (111.122.133.144) of your instance, i.e. the A-record should have the following properties:
- Type: A
- Name: mycloud
- Data: 111.122.133.144
- It might take a while until this new information has propagated through webservers. You can check whether it works by visiting https://www.dnswatch.info/. If you type in your subdomain, and hit the resolve button, it should come up with your instance’s static IP address.
- Try to visit your subdomain with a browser; you should see the Nextcloud login page.
Make sure that this works before attempting to setup HTTPS, otherwise the HTTPS setup will fail.
Part 5: Setup HTTPS
Setting up HTTPS involves two steps: configure Nextcloud to listen on the HTTPS port (i.e. 433) and creating a CA-signed certificate for your domain. Luckily the Nextcloud snap comes with a script for this:
- Log in to your instance via SSH (through the Lightsail web page).
- In the console, type the following command and follow the instructions
sudo nextcloud.enable-https lets-encrypt
- To confirm that HTTPs works correctly, point your browser to https://<your subdomain>. You should see the Nextcloud login page.
Aaaand that’s it. Now you can install the Nextcloud client and point it to your subdomain to sync files and folders directly to your hard-drive.
Additional Info
Keeping Ubuntu and Nextcloud up-to-date
Actually, you should not have to worry about updating your machine:
- the Ubuntu installation comes with a package named unattended-upgrades, that automatically installs security patches
- Snap should automatically keep Nextcloud updated as well
Starting/stopping Nextcloud (and related services like MySQL)
sudo snap stop nextcloud
sudo snap start nextcloud
For a complete list of snap commands, type snap help.


Pingback: Backups of your Nextcloud Server | ThisIsNotATest
Hi Tom,
Thanks for this post. I followed your exact steps and all initially appeared to be working well, but I’ve found that after syncing for a while the instance goes unresponsive with timeouts in the client and in the browser. Have you experienced this? I see high CPU usage and I’m wondering if the initial upload of thousands of files is causing it. CPU spikes, then drops to nothing, but the NextCloud app never recovers and the terminal is so slow it’s unusable. I’m considering trying a more powerful VPS but am first hoping to find a fix rather than throwing hardware at the problem.
Thanks,
David
Thank you for a helpful guide.
I had a little bit of trouble with the config.php
Here is what worked for me to connect to S3 as primary storage.
objectstore’ => array(
‘class’ => ‘OC\\Files\\ObjectStore\\S3’,
‘arguments’ => array(
‘bucket’ => ‘YOURBUCKETNAMEHERE’,
‘autocreate’ => false, // The bucket was already created.
‘key’ => ‘YOURKEYHERE’,
‘secret’ => ‘YOURSECRETHERE’,
‘hostname’ => ‘s3-us-east-2.amazonaws.com/’,
//’port’ => 1234,
‘use_ssl’ => true,
‘region’ => ‘us-east-2’,
// required for some non amazon s3 implementations
// ‘use_path_style’=>true
),
),
Hi, I followed the instructions on your blog and it was all working fine until I setup HTTPS using that single line of command. My Nextcloud site is no longer – any ideas? I’m thinking I would need to open up 80 and 443 ports but not sure how… following your instructions I was under the impression that it was part of the snap command. I am a newbie at this! Hopefully you are able to provide some help.
Nvm I got this, forgot to enable 443 on Lightsail side
Hi – get this message on step 5 of part 3:
An unhandled exception has been thrown:
ParseError: syntax error, unexpected ‘=>’ (T_DOUBLE_ARROW) in /var/snap/nextcloud/6916/nextcloud/config/config.php:33
Stack trace:
#0 /snap/nextcloud/6916/htdocs/lib/private/Config.php(63): OC\Config->readData()
#1 /snap/nextcloud/6916/htdocs/lib/base.php(134): OC\Config->__construct(‘/var/snap/nextc…’)
#2 /snap/nextcloud/6916/htdocs/lib/base.php(597): OC::initPaths()
#3 /snap/nextcloud/6916/htdocs/lib/base.php(1081): OC::init()
#4 /snap/nextcloud/6916/htdocs/console.php(46): require_once(‘/snap/nextcloud…’)
#5 /snap/nextcloud/6916/htdocs/occ(11): require_once(‘/snap/nextcloud…’)
It appears to be an issue with the config.php file. The contents (sensitive stuff redacted) I pasted in are as follows:
‘objectstore’ => array(
‘class’ => ‘OC\\Files\\ObjectStore\\S3’,
‘arguments’ => array(
‘bucket’ => ‘nextcloud-bucket’,
‘region’ => ‘us-west-2’,
‘autocreate’ => true,
‘key’ => ‘MYLKJEKLCLKJLJA’,
‘secret’ => ‘lkajefilc9o3pq9jh0994343/XT’,
‘use_ssl’ => true
),
),
worked like a charm. Thanks a lot.
Hello Tom,
I appreciate your post on this and it seems to be exactly what I’m looking for.
I went through your instructions but had a problem with the config.php file.
I kept getting an error with the line ”objectstore’ => array( the error seemed to be with the => notation.
Have you had this problem before?
Also, the config.php file in the Lightsail instance didn’t have the trusted domains line that needed to be edited.
If you’re still watching this post I’d be grateful for your advice.
Regards, Ian Australia
Thank you for explaining this!! Being a complete beginner I may just be missing something that is common sense. In “Section 3. #4” you stated: To do this, add the following section to /var/snap/nextcloud/current/nextcloud/config/config.php:
When I typed that in, it replied:
-bash: /var/snap/nextcloud/current/nextcloud/config/config.php:: No such file or directory
Please help, what am I doing wrong? Thank you!!
Don’t you need an enterprise license to use Next cloud with amazon s3?
Thanks
Brilliant stuff. Worked perfectly. Thanks!
Great guide!
Unfortunately, i got stuck at step 9. The browser displays the following error and i cant seem to get past it:
Internal Server Error
The server encountered an internal error and was unable to complete your request.
Please contact the server administrator if this error reappears multiple times, please include the technical details below in your report.
More details can be found in the server log.
I am a begginner so I have no idea where the logs are =/
same problem I have the same issue of this
Command “maintenance:install” is not defined.
After I executed the command sudo nextcloud.manual-install admin (password), I get the following message :
Did you mean one of these?
app:install
maintenance:data-fingerprint
maintenance:mimetype:update-db
maintenance:mimetype:update-js
maintenance:mode
maintenance:repair
maintenance:theme:update
maintenance:update:htaccess
Everything was fine up to this point. Any suggestion/comment would be appreciated.