Category Archives: Software Development

Backups of your S3-backed Nextcloud Server

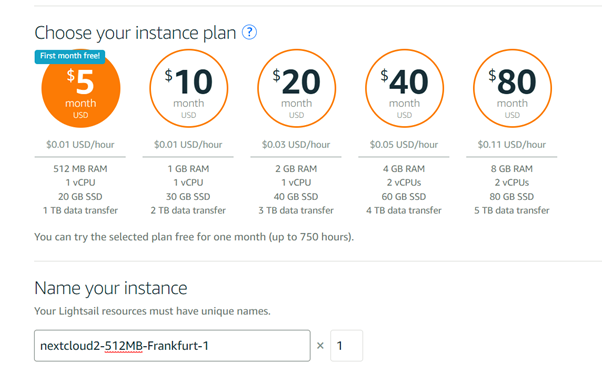
In the previous post we created an S3-backed Nextcloud server on Amazon Web Services.

This post will explain how backup such your server and how to restore those backups. In fact, we will be making a full-fledged clone of your existing Nextcloud server. Such a clone is useful as a backup, but you can also use it to test risky configuration changes before applying them to your real server.

In a nutshell, the cloning/backup process works like this:

  1. Take a snapshot of the virtual machine (including Ubuntu, Nextcloud and all the configuration data)
  2. Copy the data in S3 to another bucket
  3. Create a new virtual server based on the snapshot from step 1
  4. Point the new virtual server to the new S3 bucket from step 2
  5. And voilà: you now a have a clone of your original Nextcloud server

Let’s see how this works in detail.

Step 1: Take a snapshot

Before we can take the snapshot, we need to shutdown the server properly to avoid inconsistencies.

  1. Log in to your server via SSH
  2. Put Nextcloud into maintenance mode with the following command; this will prevent users from making any further changes to Nextcloud’s database
    sudo nextcloud.occ maintenance:mode --on
  3. Stop Nextcloud entirely with the following command:
    sudo snap stop nextcloud
  4. If the command times out, simply execute it again until you get “stopped” as a response.
  5. Go into the Lightsail web console and stop the entire server; make sure to wait for the server to reach the status “Stopped”.
  6. Now we are ready to take the snapshot: In the Lightsail web console, go to “Manage -> Snapshots” for your server
  7. Give the snapshot a name of your choice, then click “Create snapshot”.

While we are waiting for the snapshot to be taken, let’s do the backup of your S3 data.

Step 2: Backup S3 Data

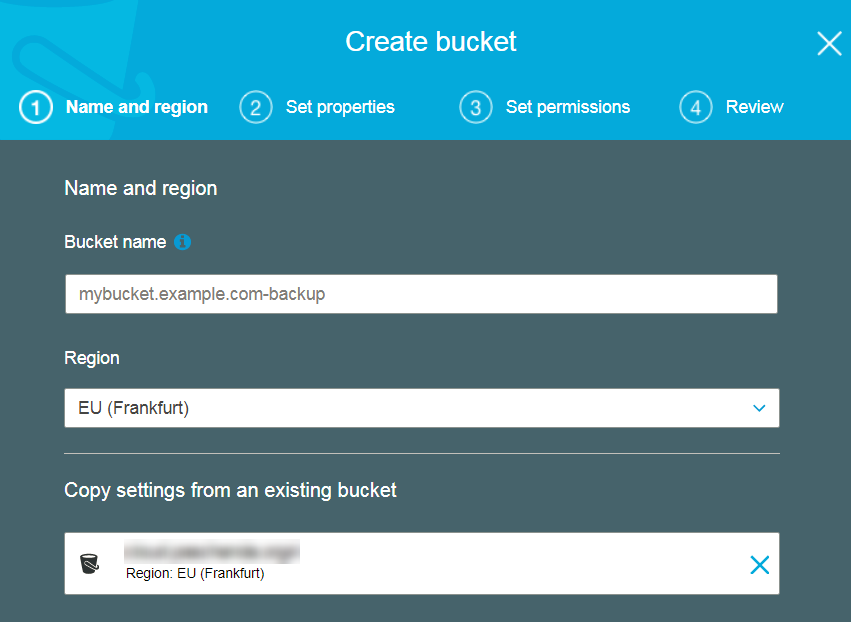
  1. In the Amazon S3 web console, create a new bucket to hold the backup of your data; make sure that the new bucket is in the same region as your original bucket (otherwise you have to pay inter-region transfer cost).
    Note that you don’t have to go through all the steps of the bucket creation wizard; after entering your bucket name and choosing the region, you can simply click the Create-button in the first screen.
  2. Now we have to copy the data from your existing S3 bucket to the new bucket. To do this, we will use the AWS Command Line Interface (AWS CLI). If you have not yet installed/configured it on your machine, follow this guide from Amazon.
  3. Assuming that you have the AWS CLI installed and configured, simply type:
    aws s3 sync s3://oldbucket s3://newbucket

    Of course you need to replace oldbucket and newbucket with the respective bucket names.

  4. Once the command completes, you have an exact copy of all your Nextcloud data in newbucket.

Step 3: Create a New Server from the Snapshot

  1. Go back to the AWS Lightsail web console and make sure that the snapshot of your server is now completed.
  2. Open the menu next to the snapshot and click “Create instance”, to create a new server based on the snapshot.
  3. Once your new server is up and running, go to “Manage -> Networking” to assign it a static IP address and open the HTTPS port on the firewall.
    Note down the IP address, we will need it soon.

Step 4: Point the New Server to the New S3 Bucket

  1. Log in to your new server via SSH
  2. Open /var/snap/nextcloud/current/nextcloud/config/config.php for editing:
    sudo nano /var/snap/nextcloud/current/nextcloud/config/config.php
  3. Look for the section named trusted_domains and change the IP address to the static IP address that was assigned to the new server.
  4. In the section named objectstore, change the S3 bucket name to the bucket that holds the copy of your S3 data.
  5. Save the config.php and restart Nextcloud with:
    sudo snap restart nextcloud
  6. Visit you new Nextcloud server in your browser, using the static IP address; you should see the login dialog of Nextcloud
  7. Verify that you can login and as a last step, disable the maintenance mode:
    sudo nextcloud.occ maintenance:mode --off
  8. Great job! You now have a fully working clone of your original Nextcloud server 🙂
  9. … speaking of which, we should probably start your original server again, so start it again via the AWS Lightsail web console, then log into it via SSH and disable the maintenance mode.

Considerations

Having a fully working clone of our Nextcloud server available is great, but in terms of convenience and cost, it still leaves some things to be desired:

  1. The backup is a manual process and I am a lazy person. So backups probably won’t occur as frequent as they should. To remedy this, the backup should be automated. This is very much possible, but it requires some effort.
  2. With this backup strategy, we have doubled our storage costs, since we have just cloned all S3 data to a second bucket. A more cost-effective strategy would be to store the backup in AWS Glacier, which storage cost is just $0.0045 per GB/month. This is just 20% of S3’s $0.0245 per GB/month.
    However, the cost structure of Glacier also complicates matters a bit: in Glacier, you also pay a fee per retrieval request. Retrieving a tens of thousands of small files is more expensive than retrieving one large file. It is also much more cumbersome. This means that we should compress your S3 bucket into one large zip file before storing it in Glacier. For this, we have to download the files from S3 and zip them locally. This may require a large harddisk if we have a lot of data in S3.
    We also have to deal with Glacier’s somewhat special usability: in Glacier, retrieving a file takes multiple hours and hence goes through a couple of indirections.
    All of these things can be dealt with, but they require some effort – especially if the solution is to be automated.

There is still room for improvement, but for now I am happy to have a working backup.

Setting up Nextcloud on Amazon Lightsail with an S3 Backend

This post will explain how to setup a Nextcloud server on Amazon Web Services with the following features:

  • based on a virtual Linux server in the Cloud (AWS Lightsail)
    AWS Lightsail is an easy-to-use service from Amazon that let’s you spin up a virtual server in less then a minute; the cheapest one is 5 USD/month
  • uses AWS S3 as a storage backend
    AWS S3 is Amazon’s object storage solution; I use it here due to its low cost (100 GB is just 2.45 USD/month)
  • is reachable via the internet at a subdomain of your choosing (e.g. mycloud.example.com)
  • supports HTTPS with CA-signed certificates from Let’s Encrypt
    Let’s encrypt provides free CA-signed certificates for the average person; they are sponsored by Mozilla, Google and others

This post is split into several parts – here is an outline:

  • Part 1: create a virtual Linux server on AWS Lightsail
  • Part 2: generate credentials for AWS S3
  • Part 3: install and configure Nextcloud
  • Part 4: point your subdomain to the virtual server
  • Part 5: enable HTTPS and create certificates


Part 1: Create the virtual server

First, we need to create a server. We will be using a small virtual Linux server which runs Ubuntu.

    1. Log in to AWS Lightsail; create an account if you don’t have one.
    2. Create a new Linux instance running Ubuntu


    3. Your instance should be up and running after a minute or so. To verify this, you can log in to the instance via SSH using the console-button in in Lightsail:


    4. Before we start playing with the instance though, there are two more things to do: In the web console, go to manage -> networking to see the network settings for your instance:


    5. Add HTTPS (port 443) to the list of open ports; this will allow incoming connections via HTTPS
    6. Click the button “Create static IP” to get a public IP address that never changes. If you skip this step, Amazon might change your instance’s public IP address during a restart. This would mess up the DNS settings we will put in place later.
    7. Note down the static IP address; we will need it later.

    Part 2: Create a user for AWS S3

    Since we want to use AWS S3 as a storage backend, we need to give your new instance access to the S3 service. We will do this by creating a new user and getting the so-called API-Access Key. This key will then later be used to configure Nextcloud.
    To get your API access key, do the following:

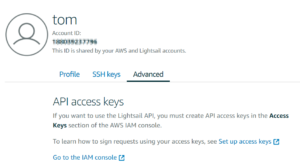
    1. In the Lightsail web page, go to Account -> Advanced; click the link Go to the IAM console


    2. In the IAM console, go to the Users-section and click Add User


    3. Create a new user with the following settings:
      • Username: nextcloud (you can also pick something else if you like)
      • Access type: Programmatic access
    4. Click “Next: Permissions”


    5. Select “Attach existing policies directly”
    6. Filter for “S3” and select AmazonS3FullAccess
    7. Click “Next: Review” and then “Create user”
    8. The new user will be created and Amazon shows you the security credentials. Copy the access key ID and the secret access key – we will need those later.


      Make sure to copy those NOW. Amazon will not show you the secret access key again.

    Part 3: Install Snap, Nextcloud and configure S3 access

    In Part 3, we will install Nextcloud and configure it for access to S3. For installing Nextcloud, we will use the pre-packaged Nextcloud Snap. This already comes pre-configured and brings all its dependencies. Plus, it contains an easy-to-use script to add certificates  for HTTPS later.

    1. In the AWS Lightsail web console, click the console-button to login via SSH.
    2. First, we need to install Snap; Snap is a kind of container/package manager that runs software bundles including all their dependencies; it also keeps those bundles up-to-date automatically. To install snap, simply type:
      sudo apt update
      sudo apt install snap
    3. Once snap is installed, we can install the Nextcloud Snap:
      sudo snap install nextcloud
    4. Before doing anything else, we need to configure Nextcloud to use S3 as primary storage. To do this, add the following section to /var/snap/nextcloud/current/nextcloud/config/config.php:
      'objectstore' => array(
        'class' => 'OC\\Files\\ObjectStore\\S3',
        'arguments' => array(
          'bucket' => '<choose a bucket name>',
          'region' => '<region where your instance resides, e.g. eu-central-1 for Frankfurt>',
          'autocreate' => true,
          'key' => '<your API key from part 2>',
          'secret' => '<your API key secret from part 2>',
          'use_ssl' => true
        ),
      ),

      A couple of notes on this:

      • Nextcloud will automatically create the S3 bucket you specify in the region that you specify
        Make sure that the S3 bucket and the instance are in the same region to avoid paying cross-region data transfer cost
      • The so-called bucket name is S3-terminology for a folder.
        This name needs to be unique (like an e-mail address). So just using “nextcloud” is not going to work.
        I recommend something like <mycloud.example.com-currentdate>.
      • To edit the config file, you need root-permissions
      • it is important to make this setting BEFORE setting up the admin account for Nextcloud. The reason is that changing the primary storage breaks all user profiles in Nextcloud – this includes the admin profile (see this Issue in Nextcloud’s github for more details).
    5. Now we are ready to setup the Nextcloud admin account and make Nextcloud ready-to-run: In the SSH console type:
      sudo nextcloud.manual-install admin <admin password of your choosing>
    6. Finally, let us add the domains from which Nextcloud will be served. Open config.php for editing again (it looks different this time due to the installation in the previous step).
    7. In config.php, find the section for trusted_domains. Add the IP address of your instance and also the domain:
      'trusted_domains' => array (0 => 'localhost', 1 => '111.122.133.144', 2 => 'mycloud.example.com',),
    8. Restart the Nextcloud snap with
      sudo snap restart nextcloud
    9. Open a browser and visit your IP address: http://111.122.133.144. You should see the login page for Nextcloud. You should be able to login with your admin password.

    Part 4: Setup Subdomain

    In this chapter, we will point your subdomain (e.g. mycloud.example.com) to the virtual instance’s static IP address. I assume here that you already have a domain registered (e.g. example.com). How exactly this works highly depends on the provider you used for registering the domain. Hence I can only provide an abstract description here:

    1. Go to your domain registrar website (the company where you got the domain) and log in
    2. Open the DNS settings for your domain (example.com)
    3. Create a new A-record that points the subdomain (mycloud.example.com) to the static IP address (111.122.133.144) of your instance, i.e. the A-record should have the following properties:
      • Type: A
      • Name: mycloud
      • Data: 111.122.133.144
    4. It might take a while until this new information has propagated through webservers. You can check whether it works by visiting https://www.dnswatch.info/. If you type in your subdomain, and hit the resolve button, it should come up with your instance’s static IP address.
    5. Try to visit your subdomain with a browser; you should see the Nextcloud login page.
      Make sure that this works before attempting to setup HTTPS, otherwise the HTTPS setup will fail.

    Part 5: Setup HTTPS

    Setting up HTTPS involves two steps: configure Nextcloud to listen on the HTTPS port (i.e. 433) and creating a CA-signed certificate for your domain. Luckily the Nextcloud snap comes with a script for this:

    1. Log in to your instance via SSH (through the Lightsail web page).
    2. In the console, type the following command and follow the instructions
      sudo nextcloud.enable-https lets-encrypt
    3. To confirm that HTTPs works correctly, point your browser to https://<your subdomain>. You should see the Nextcloud login page.

    Aaaand that’s it. Now you can install the Nextcloud client and point it to your subdomain to sync files and folders directly to your hard-drive.

    Additional Info

    Keeping Ubuntu and Nextcloud up-to-date

    Actually, you should not have to worry about updating your machine:

    • the Ubuntu installation comes with a package named unattended-upgrades, that automatically installs security patches
    • Snap should automatically keep Nextcloud updated as well

    Starting/stopping Nextcloud (and related services like MySQL)

    sudo snap stop nextcloud
    sudo snap start nextcloud

    For a complete list of snap commands, type snap help.


Set multiple startup projects in Visual Studio 2010 via macro

——RANT MODE: ON—–

In one C++ project I am currently working on (yes, C++ is not dead 😉 , I frequently have to switch between different startup projects in Visual Studio. Also, I sometimes want to start several executables at once. For this, Visual Studio supports setting of multiple startup projects.

However, settings those by hand can be a bit tedious, so I tried to make a visual basic macro for it. Ok, to be honest I did not try to make one – I tried to steal one from the internet.

A bit of googling revealed the following post which gives an approach for a single startup project and a “theoretical” solution for multiple startup projects:
http://matthiaskraaz.blogspot.com/2011/08/visual-studio-setting-multiple-startup.html

Turns out, setting multiple startup projects programmatically is not possible in Visual Studio 2005.

With Visual Studio 2010 however, it is possible. Here is how it works:

——RANT MODE: OFF—–

Public Sub SetMyStartupProjects()  

  'Create an array and fill it with the startup projects you would like to set
  Dim StartupProjectsArray As Object = System.Array.CreateInstance(GetType(Object), 3)
  StartupProjectsArray(0) = "MyProj1.vcxproj"
  StartupProjectsArray(1) = "MyProj2.vcxproj"
  StartupProjectsArray(2) = "MyProj3.vcxproj"

  'Set the startup projects of the current solution
  Dim CurrentSolutionBuild As SolutionBuild = DTE.Solution.SolutionBuild
  CurrentSolutionBuild.StartupProjects = StartupProjectsArray

End sub

The code for creating the array might look a bit clunky, but a collection or any array defined via literals doesn’t work.
The type you use on the right hand side of CurrentSolutionBuild.StartupProjects = really has to be of the type System.Array and the things inside the array really need to have the type Object. The rest is straightforward.

As a bonus, here is a little helper method that takes a usual VB collection:

Private Function SetStartupProjects(ByVal StartupProjects As Collection)
  Dim StartupProjectsArray As Object = System.Array.CreateInstance(GetType(Object), StartupProjects.Count)
  Dim i As Integer
  For i = 0 To StartupProjects.Count - 1
    StartupProjectsArray(i) = StartupProjects(i + 1)
  Next

  Dim CurrentSolutionBuild As SolutionBuild = DTE.Solution.SolutionBuild
  CurrentSolutionBuild.StartupProjects = StartupProjectsArray
End Function

You can call it like this:

Public Sub SetMyStartupProjects()
  'Create a collection that you would like to set
  Dim StartupProjects As New Collection
  StartupProjects.Add("MyProj1.vcxproj")
  StartupProjects.Add("MyProj2.vcxproj")
  StartupProjects.Add("MyProj3.vcxproj")

  'Set the startup projects of the current solution
  SetStartupProjects(StartupProjects)
End sub

I wonder why Microsoft doesn’t allow collections or straightforward String-arrays in the first place. Well, whatever, if you can encapsulate the ugly stuff, it is not ugly anymore.

Happy coding!


Getting Qt and Ruby (=QtRuby) running on Windows 7 (and Windows XP)

Update 2011-10-16:
Following a very-well written post on stackoverflow, getting QT and Ruby running on Windows 7 is quite easy nowadays.

Quote from http://stackoverflow.com/questions/7577248/how-can-i-get-qt4-running-with-ruby-1-9-2-on-windows-7:

The following steps work on Windows 7:

  1. Install Ruby 1.9.2 via the official download page.
  2. In a Windows shell, run gem install qtbindings.

The trivial example (require 'rubygems'; require 'Qt') should now work.

Hence the tutorial below is now obsolete. However, I will keep it here for reference purposes.

——OUTDATED TUTORIAL—–

This is an update on a previous tutorial which explained how to write Ruby applications using Qt on Windows XP. This new version is dealing with Ruby applications using Qt on Windows 7 (but it should also work in Windows XP). Also, it uses Qt 4.6.1 instead of Qt 4.3.4 and it also brings a newer version of QtRuby (2.1.0).

——RANT MODE: ON—–

Believe it or not: In some QtRuby application I wrote some time ago, somebody discovered a “hidden feature” (let’s not use the b-word here). To remove this “feature” I had to re-install my development environment since in the meantime I got a new laptop (really fancy one with SSD and all, I like it).

Three years ago, getting QtRuby running on Windows was so complicated that it was worth a lengthy  tutorial.
But now it’s 2011. Should be much better now, right?
Turns out, in June 2011 it is so complicated, that dr1ku wrote an even longer tutorial  (no bashing indented, his article is really exhaustive with a lot of insight and information).
Today it is my turn again. Luckily I found a solution that is reasonably simple, but still requires some not-too-obvious steps (at least for a ruby-noob like myself).

So. Here we go again. I wonder what it will be like in 2014.
Oh wait, the end of the world is scheduled for 2012. Phew, that will save us some trouble.

——RANT MODE: OFF—–

As in the previous installment of this guide, I did not use the latest versions of Ruby/Qt/QtRuby, because they simply don’t work together (as dr1ku points out in his post mentioned above). I will assume that Ruby is not yet installed on your system.

  1. Download and install Ruby 1.8.7-p334.
    Make sure to use the RubyInstaller version. You can find it at rubyforge.During installation, make sure to add ruby to your path.
    Verify the installation by opening a command line and type ruby --version. It should yield:
    ruby 1.8.7 (2011-02-18 patchlevel 334) [i386-mingw32]
  2. Update gems to the latest version by typing
    gem update --system
  3. Install rake (which is a prerequisite for QtRuby)
    gem install rake
  4. Install DevKit (which is a prerequisite for QtRuby)
    Follow the instructions found here.
    Don’t panic: The instruction looks lengthy, but most of the steps are optional or for updating legacy versions of DevKit.
  5. Finally install QtRuby gem. On the command line type
    gem install qtruby4 --remote --platform=mswin32
    The --platform=mswin32 is required to override the platform check of gems.
  6. Verify the installation by opening a command line and type irb (an interactive ruby interpreter)
    Type require 'rubygems' and hit enter. It should yield true.
    Now type require 'Qt' which should also yield true.

Well, that’s it. For getting-started instructions and some more information, please visit the previous installment of this guide  and start reading after “That’s it!”

——RANT MODE: ON—–

Where was I? Oh right, that “hidden feature” is still hiding…

——RANT MODE: OFF—–

Splitting mp3-files using mp3splt and batch files

——RANT MODE: ON—–

Back in the good old times of audio tapes, the concept of a track was not built into the system. This had pros and cons: It was quite easy to fast-forward or rewind to a certain position in a song or radio play. However, you could not just skip a track or forward to the next track, since a tape does not support tracks. (Actually, on some fancy tape decks, there was a button for that. Those things had a silence-detection built in and hence knew when a track ended and a new one began).
Today the situation is reversed: You can easily navigate backward and forward between tracks, but navigating within them is cumbersome or impossible on most cheap mp3 players (such as the ones I happen to possess).
Another disadvantage of that cheap players is that they only remember the track, that was played when they were turned off, but not the position within the track. Since some audiobooks and podcasts come in rather long tracks, this is a pain in the ass as you spent quite some time fast-forwarding and rewinding through the track while you are hammering your brain trying to remember where you left off. And don’t you dare to let your finger tremble just the smallest bit on the fast-forward button, since on most players this means “next track” and you will have to start over. Argh!

——RANT MODE: OFF—–

So, sometimes I have the need to split large mp3-files into smaller ones. In audiobooks and podcasts, it is most convenient to split the files at ‘silence positions’ i.e. when no one is talking. There is a very nice tool that can do the job for you: It’s called mp3splt and you can get it here:

http://mp3splt.sourceforge.net

It’s a command line tool, but you can also download a GTK-frontend. mp3splt can search for silence positions within an mp3 file and then let it split the file at just those positions – neat! And just a few clicks.

But wait: I have quite a number of podcasts (e.g. many episodes of se-radio). And ‘quite a number’ times ‘a few clicks’ is definitely too much boring work. But thou shall not worry: mp3splt is a command line tool, and hence can be used from within batch files.

Splitting a Single File

The following batch file splits a given file (‘example.mp3’) into smaller files at all silence positions that are longer than 2 seconds and stores the resulting files in a folder that is named like the file, but without the extension (‘example’).

REM splitfile.bat
mp3splt -s -p min=2 -d "%~n1" %1

Splitting all Files in a Directory

The following batch file calls the first file for all mp3s in the current directory:

REM splitdir.bat
for /f "tokens=*" %%a IN ('dir /b *.mp3') do call splitfile.bat "%%a"

Yay, works! (Even if there are blanks in the file names.)

Deploying Ruby (and QtRuby) Applications

Important Note
This post is outdated and as David Mullet points out here, ocra is the recommended way for deploying Ruby applications on windows.

Disclaimer
This post is about deploying Ruby apps like in “plain-old-ruby-desktop-apps-where-no-rails-is-involved” and covers only MS Windows.

——RANT MODE: ON—–

OK, now you have spent the last few days hacking together your Qt-and-Ruby application. You want to show it to your client to get some feedback on it. So you type: “Dear Mr. Client, attached to this mail you find … eh, ahem” Well, what exactly do you attach to the mail? A howto.txt that describes how to install Ruby and then use the gem command line version to install qt-ruby and whatever other dependencies your application might have? As you already know, there might be tons of problems like: Does your client have admin privileges on his computer? Is he scared to death by a command line? Do you really want to bother your client with such stuff?
No, “Ruby means less painful programming.” they told you. Well they didn’t say anything about deploying, did they?

——RANT MODE: OFF—–

Luckily there guys like Erik Veenstra who think that “Ruby also means less painful deployment”. Erik wrote two tools:
tar2rubyscript
and
rubyscript2exe

tar2rubyscript takes a folder full of Ruby files (and subfolders full of Ruby files) and creates one single Ruby script that contains your whole application.

rubyscript2exe takes any ruby script, runs it, analyzes the dependencies and packages everything into one .exe file.

So here is how to deploy a Ruby desktop app. I will not go into much detail, since everything is explained very well in the tutorial on Erik’s page:
distributingrubyapplications

  1. Install tar2rubyscript and rubyscript2exe:
    gem install tar2rubyscript
    gem install rubyscript2exe
  2. Create a file named “init.rb” that requires you main application start script and put it in your top-level source code directory. tar2rubyscript will use init.rb to start your application. Mine looks like this:
    Dir.chdir oldlocation
    require 'main.rb'
    The first line switches the directory, since when starting an application that was packed with tar2rubyscript, it will be extracted to a temporary directory and started from there, but you probably want the current directory to be the directory where the user double-clicked the .exe. I have stolen that line from
    www.erikveen.dds.nl/tar2rubyscript/#3.2.0
  3. Pack your application into a single ruby script (assuming that ‘source’ is a directory containing ‘init.rb’ and your application’s source code)
    tar2rubyscript source
  4. Pack your application into an executable
    rubyscript2exe killerapp.rb --rubyscript2exe-verboseThe parameter --rubyscript2exe-verbose will make rubyscript2exe give some information about what it is doing.
  5. You will end up with a file named killerapp.exe. Double clicking it should start your application. On any Windows PC.

This is it. Very simple, eh? However, there are some minor issues that I’d like to mention:

  1. As stated above, rubyscript2exe starts your application to investigate its dependencies. If you have an application that does not quit by itself, rubyscript2exe will not continue unless you quit the application manually. To avoid that, you may add the following line to the appropriate place in your application:
    exit if RUBYSCRIPT2EXE.is_compiling?
    Keep in mind, that some dlls do not get loaded by your application unless you really use them so if you use above line, make sure that all dlls that you app depends on have been loaded.
  2. When you double-click killerapp.exe, a DOS-window appears, showing the output of your application. In case of a command line application this is fine. In case of a Windows application you probably don’t want a DOS-box. Use
    rubyscript2exe killerapp.rb --rubyscript2exe-rubyw
    to create an executable that starts without a DOS-box.
    However, if I switch off the DOS box, my Qt-Ruby application refuses to start.
  3. When your executable gets started, it extracts all dlls, the Ruby runtime and your application to
    [Current User's Home]\eee\eee.killerapp.exe and starts from there. Your application’s dependencies might include some large dlls (e.g. QtGui4.dll which is 8 MB), so the extraction takes some time and your application startup feels somewhat slow.
    In case of my application, the directory from which the application is running is 36 MB large and even after the application has quit, not everything is deleted and the dlls take up 21 MB of disk space. This is a HDD memory leak!

That’s it for now. As soon as I make progress on the latter two issues, I will update the post accordingly. I you have a hint, I would welcome your comment.

Happy deploying!

Getting Qt and Ruby (=QtRuby) running on Windows XP

Important note

An update on this post is available here. The improvements are

  • only 6 steps instead of 10
  • QtRuby 2.1.0 instead of whatever old version is installed by the guide below
  • Qt 4.6.1 instead of Qt 4.3.4
  • Ruby 1.8.7 instead of Ruby 1.8.6

This is a tutorial about writing Ruby applications that use the Qt framework on Windows XP. For doing so, the Qt-Ruby bindings named QtRuby are used.

——RANT MODE: ON—–

Ruby programs that have a nice GUI? Is that possible? With all that Ruby On Rails stuff going on, good old desktop applications have been left behind. And so has the topic of creating a desktop application that is pleasant to use and to code.

When combining Ruby and Qt, developers finally have a chance to create Ruby GUI applications that are neither pain in the ass for developers nor pain in the eye for the user.

——RANT MODE: OFF—–

Disclaimer
At the time of writing this I have very little experience with QtRuby. However I just wanted to get started with it and did not find a decent guide for doing so on windows, so I just put together what I learned in the first few days.
For the sake of simplicity and brevity, this guide does not use the latest versions of Ruby, Qt and QtRuby. Instead, it is using prebuilt binaries and installers, that have been created by some nice guys (for getting the latest version running, see comments).
You have been warned. Comments are welcome.

Setting everything up

Getting your first QtRuby program to run under windows is surprisingly simple.

Installing Ruby

  1. Download the Ruby 1.8.6.25 One-Click Installer from the official Ruby site: http://rubyforge.org/frs/download.php/18566/ruby186-25.exe. Make sure to use that exact version. Otherwise you might run into dll-version problems (see Yann’s comment for details).
  2. During installation, check the SciTE and Enable RubyGems options. SciTE is an editor and Gems is the Ruby package manager (we won’t need those here, but they are both very handy tools).
  3. Install to c:\ruby. You may of course choose a different path, but for the rest of this guide I will assume this location.
  4. When installation is finished, open a shell and type ruby --version. It should say ruby 1.8.6.

Installing Qt

  1. Download  Qt 4.3.4 Open Source Edition from ftp.ntua.gr/pub/X11/Qt/qt/source/qt-win-opensource-4.3.4-mingw.exe and install it.
  2. During installation,  check the Install mingw option (if you do not yet have mingw installed). mingw is a gcc (C++ compiler) for Windows. Qt 4.3.4 Open Source comes with precompiled binaries that need the runtime dll (mingwm10.dll) of mingw.
  3. To check, whether the installation worked, go to Start->Programs->Qt->Examples and Demos. You should see a window with fancy animation that offers various examples of Qt in action.

Installing QtRuby

  1. Get the installer from vision.eng.shu.ac.uk/mmvlwiki/index.php/Qt4-QtRuby_installer_for_Microsoft_Windows and install it.
  2. Open irb (that’s a Ruby shell) by typing irb at your Windows shell.
  3. Type require 'Qt4' and execute it by pressing Enter. It should yield true

That’s it! Now you are ready to begin development of QtRuby programs.
You may leave now if you want and hack away on your own. However, if you want some advice on how to start and where to get information, I kindly invite you to stay a bit longer.

Hello Qt, Hello Ruby!

Let’s see if we can greet our new friends. Type the following program into the irb. Alternatively you may copy-paste the code into a fresh file. Name it main.rb and run it with ruby main.rb.

require 'Qt'
app = Qt::Application.new(ARGV)
button=Qt::PushButton.new("Hello Ruby, hello Qt!")
button.resize(100,30)
button.show
app.exec

Hello Ruby, hello Qt

You should see something that looks strikingly similar to the screenshot.

Getting Help on Qt
Qt is the best-documented library I have ever seen. You can find everything at
doc.trolltech.com/4.3
(The QtRuby version you downloaded has been built against Qt 4.3.1)

The docs are available as an offline version: If you install and compile an open source version of Qt (see this post ), you will get a program called Qt Assistant (assisstant.exe) that offers the full documentation and some neat searching features.
When installing Qt, you will also get a nice program called qtdemo.exe. It contains lots of example programs (in fact the Regular Expressions ‘example’ is one of my favorite tools at work).

However, there is one drawback on both, the documentation and the example programs. It is all written for C++ coders. Damn!
Fortunately the difference between C++-Qt and Ruby-Qt is not that big. But it gets even better…

Tons of Examples (in Ruby!)
…because a very kind guy named Richard Dale converted the Qt examples from C++ to Ruby. They come with the QtRuby source package, that can be found on the Rubyforge homepage of Korundum/QtRuby (rubyforge.org/frs/?group_id=181). Let me show you how to get them running (and introduce you to the resource compiler on the way).

  1. Download e.g. qt4-qtruby-1.4.9.tgz and unpack it
  2. Browse to the directory qt4-qtruby-1.4.9\ruby\qtruby\examples\graphicsview\collidingmice and open a shell
  3. Type ruby main.rb
  4. And tadaah – you will get an error message saying no such file to load -- qrc_mice.rb (LoadError)

The reason for this error is that the resources (images in this case) have to be available for the program to work. To create the required resource file, we have to execute the Ruby-pendant of the Qt resource compiler (rbrcc, probably located in c:\ruby\bin)
Type
rbrcc mice.qrc -o qrc_mice.rb
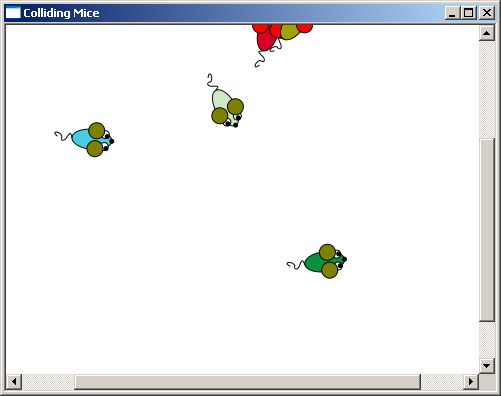
Try ruby main.rb again. This time you should see a window with some mice running around in it.

Colliding Mice Example in Ruby

More, More, More
When finished with this short introduction, I strongly recommend to check out
techbase.kde.org/Development/Languages/Ruby
immediately. It explains how the concepts of Qt/C++ translate to QtRuby, gives a few nice tricks, that are not possible in C++ and demonstrates some convenient features of QtRuby. There’s also a bunch of links at the bottom of that page, that points out more resources to learn about QtRuby.
Great stuff, one small warning: It appears that the example code is written for Qt 3.x. So keep that in mind when copy-pasting it.

Well, that’s it for now. Happy coding!

Excel VBA Code Updater

One problem when developing VBA applications is that bringing bugfixes and improvements to your users can be difficult since an Excel Workbook contains both, code and data. Certainly you cannot expect the typical MS Excel user to import .bas files or things like that.

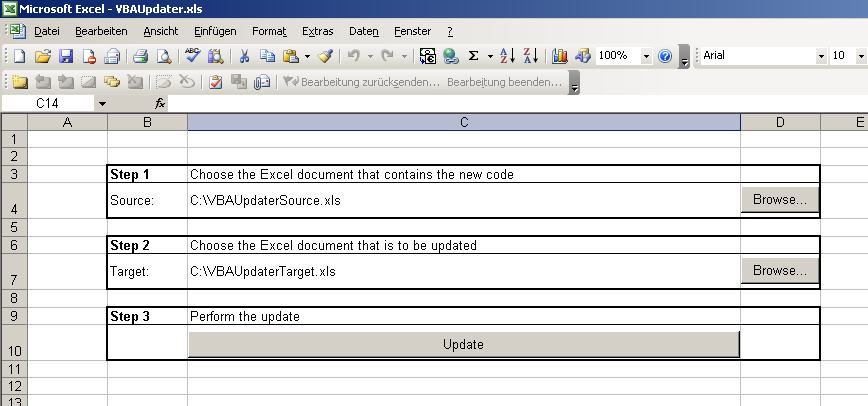
To solve this problem, I wrote a small Excel tool called ‘VBA Updater’. It updates the VBA code of an Excel Workbook from another Workbook without touching the data in the Worksheets.

You can find a description and the tool at: VBA Updater

The VBA Updater Tool

Qt Open Source 4.3.4 and Visual Studio

The commercial version of Qt has a very nice feature. Given a qmake project file, it is able to create a .vcproj file that can be opened with Visual Studio. If everything is setup correctly you can instantly compile your project using the Visual Studio C++ compiler. This way it is not much of a problem to develop a C++ project where some developers are linux geeks and some are lazy windows users who do not like mingw or make (for good reasons, of course) and who absolutely hate gdb (for even better reasons).

Most unfortunately, this feature was not available in the Open Source version of Qt. You either had to create their project files manually, which is a very painful task for several reasons – one of them being that the MOC and the UIC have to be integrated into the build process. Or you had to set up a Makefile project using Visual Studio. That’s what I was about to do this morning, when I stumbled across the following article:

Qt/Windows Open Source Edition to support VS Express

The most important statement in above article is the following:

“We have decided to support Visual Studio Express with Qt/Windows Open Source – we are dual licensing the MSVC Makefile and project generator (Sorry, no VS Integration for Open Source users)”

——RANT MODE: ON—–

Obviously, second-most important statement is this one:

“The Visual Studio Express environment is just so much superior and easier to use for existing Windows developers compared to what MinGW provides.” – I could not agree more.

——RANT MODE: OFF—–

So since 4.3.2 even the Open Source version of Qt is able to create vcproj files. However, since the Open Source version is configured for mingw when installed, just throwing qmake at your project file will only create a usual Makefile.

Creating a Visual Studio Project File from a qmake Project File

  1. To create a vcproj file, you will have to use the correct mkspec and change the template from “app” to “vcapp”. The following command does the job for Visual Studio 2005:
    qmake -tp vc -spec win32-msvc2005
    If you are using a different version of Visual Studio, have a loot at QTDIR/mkspecs to find the correct mkspec for you. QTDIR is the directory where you installed Qt.
    If your project file was named “myproject.pro” you will now find a file named “myproject.vcproj” in the same directory.
  2. Try to build the application. You will be greeted by the following error message:
    fatal error LNK1181: cannot open input file 'c:\<QTDIR>\lib\qtmain.lib', where QTDIR corresponds to the directory of your Qt installation.

Building Qt with the Visual Studio Compiler

The problem is, that the prebuilt binaries that come with the Open Source Qt distribution for Windows cannot be used by the Visual Studio compiler. Heck, they do not even have the right name.

How to fix this? Well, you have to build those files from the Qt sourcecode using the Visual Studio compiler. Do the following:

  1. (Skip this step, if you are using the commercial version of Visual Studio)
    The Express Version of Visual Studio does not include the Platform SDK. Unfortunately this SDK contains some headers and libs that are required to compile Qt. Go to Windows Server 2003 R2 Platform SDK Web Install to install it. Make sure to include the Core SDK AND the Web Workshop SDK during installation.
    Have a look in the directory of the SDK and locate the file SetEnv.Cmd. Add the directory to your path (Should be something like C:\Program Files\Microsoft Platform SDK for Windows Server 2003 R2. Do not forget to surround it with double quotes (“) if it contains blanks.)
  2. Add <VisualStudioDirectory> \VC\bin to your path.
  3. Then open a command line and go to the Qt installation directory. Type vcvars32.bat.
    This will create the environment variables required for the next step. The batch file resides in the VC\bin directory of your Visual Studio installation.
  4. (Skip this step, if you are using the commercial version of Visual Studio)
    Type SetEnv.cmd to create the environment variables necessary for including the files of the Platform SDK
  5. Type configure -platform win32-msvc2005.
    This will tell Qt to prepare itself for being compiled by the Visual Studio compiler. Again, if you use another version of VS than 2005, replace win32-msvc-2005 with the makespec appropriate for you.
  6. Type nmake. Then go and have a break. Compiling Qt will take a while.
    Actually, I was surprised that this last step works. Up to this day I thought that the OS version of Qt could not be built with Visual Studio. You had to apply a batch distributed by some helpful people under the name qtwin (Here is a german tutorial on that stuff). It appears that those dark days are over now.
  7. Now try building your application again. Everything should work fine now.

I hope this guide helps you to get going with Visual Studio and Qt Open Source. If you have any trouble or suggestions, feel free to drop me a mail or post a comment.

Classic for-loop in a windows batch file

Question: How can a classic for loop

for (int i=0;i<10;++i) {
// do stuff
}

be realized in a windows batch file?

Answer:

echo off
SET /a i=0

:loop
IF %i%==10 GOTO END
echo This is iteration %i%.
SET /a i=%i%+1
GOTO LOOP

:end
echo That’s it!

The answer uses goto and the /A option of the set command. Without that option, SET interprets the right side of the equals sign as a string and i would contain ‘i+1’, then ‘i+1+1’ and so on. To make SET interpret the right side as an arithmetic operation, the option /A is required. Enter SET /? to get a detailed explanation of the SET command’s capabilities.